Transparent PNG White Outline After Resizing: Measured
A white outline on a resized transparent PNG is rarely the resizer's fault. I measured three of them, found the real cause, and cleaned the ring in one pass.

Contents
That pale ring around your cutout probably didn’t come from the resize. I shrank the same 1024 px circular cutout in Pillow, ImageMagick and Chrome’s canvas, and not one of them leaked color into the edge. The ring was already in the file: semi-transparent edge pixels still carrying the white background the subject was photographed against.
Put the file on something dark before you blame the resizer
Drop the PNG onto a dark surface and look hard at the edge. A rim that reads brighter than the subject next to it means the cutout kept its old background. In my test file that rim measured 48.4 luma over a #111111 card, against 40.3 for the clean version of the same image, which pushes edge-to-background contrast from 23.3 up to 31.4.
You don’t need a tool for that check. macOS Preview in dark mode, Windows Photos, or a single slide in Google Slides with a near-black fill will show it in about ten seconds. The catch is that most native viewers open a transparent PNG on white or on a grey checkerboard, and both of those hide the exact defect you’re hunting, because a pale rim against a pale field is invisible. Fill the slide black first, then paste.
What actually sits under a transparent pixel
A PNG keeps color and alpha in separate lanes, and it never multiplies one into the other on disk. Section 6.2 of the W3C’s PNG specification calls that arrangement “unassociated” or “non-premultiplied” alpha, and says the color values are not premultiplied by the pixel’s alpha.
So a pixel you cannot see still has a color, and that color rides along in the file. This is the fact the entire “premultiply before you resize” advice stands on. The fact holds. It just isn’t what is happening to your logo.
Three resamplers, one cutout, zero leak
I built a 1024 px circular cutout with a properly antialiased edge and saved it twice: once with pure white sitting under every fully transparent pixel, once with pure black. If a resizer averages color and alpha independently, those two files have to come out different at the edge, and the white one has to end up lighter. Then I downscaled both to 256 px four ways.
| Resampler | Version | Edge ring | Max edge difference, white file vs black file |
|---|---|---|---|
| Pillow, LANCZOS | 12.2.0 | 844 px | 0.0 |
| Pillow, BICUBIC (its default) | 12.2.0 | 884 px | 0.0 |
| ImageMagick, Lanczos | 6.9.12 | 844 px | 0.0 |
Chrome canvas, drawImage | 148 | 792 px | 0.0 |
Zero, four times. Every one of those engines already premultiplies internally before it resamples, so the invisible white never touched the visible edge. The browser result has a documented reason behind it: MDN warns on putImageData() that “due to the lossy nature of converting to and from premultiplied alpha color values”, pixels can read back different from what you wrote, and the WHATWG thread on ImageData says plainly that in every implementation the author knew of, canvas data is stored premultiplied. Storage is premultiplied, the API you read it through is not.
Which means the most repeated fix on this topic, switch your resample filter or premultiply the alpha, changes nothing for anyone using mainstream tools in 2026. I’d rather tell you that than hand you a knob that does nothing.
The ring came with the cutout
This is what a background remover hands you when it estimates alpha but never corrects the color underneath. A pixel that straddles the subject and the old backdrop was captured as a blend of both, and that blend gets stored as-is: observed = alpha × subject + (1 − alpha) × old background. Photograph a vase on a white sweep and every semi-transparent pixel along its silhouette is part vase, part sweep. Nothing in the file marks that white as foreign.
I simulated exactly that on my test cutout and measured the edge over a dark card. On the 1024 px master the ring sat 31.06 luma points brighter than the clean reference, peaking at 62.38. After the downscale to 256 px it was 8.10 points, peaking at 16.96. Chrome’s canvas produced 8.42 on the same file, which is close enough to call it the same number from a different engine.
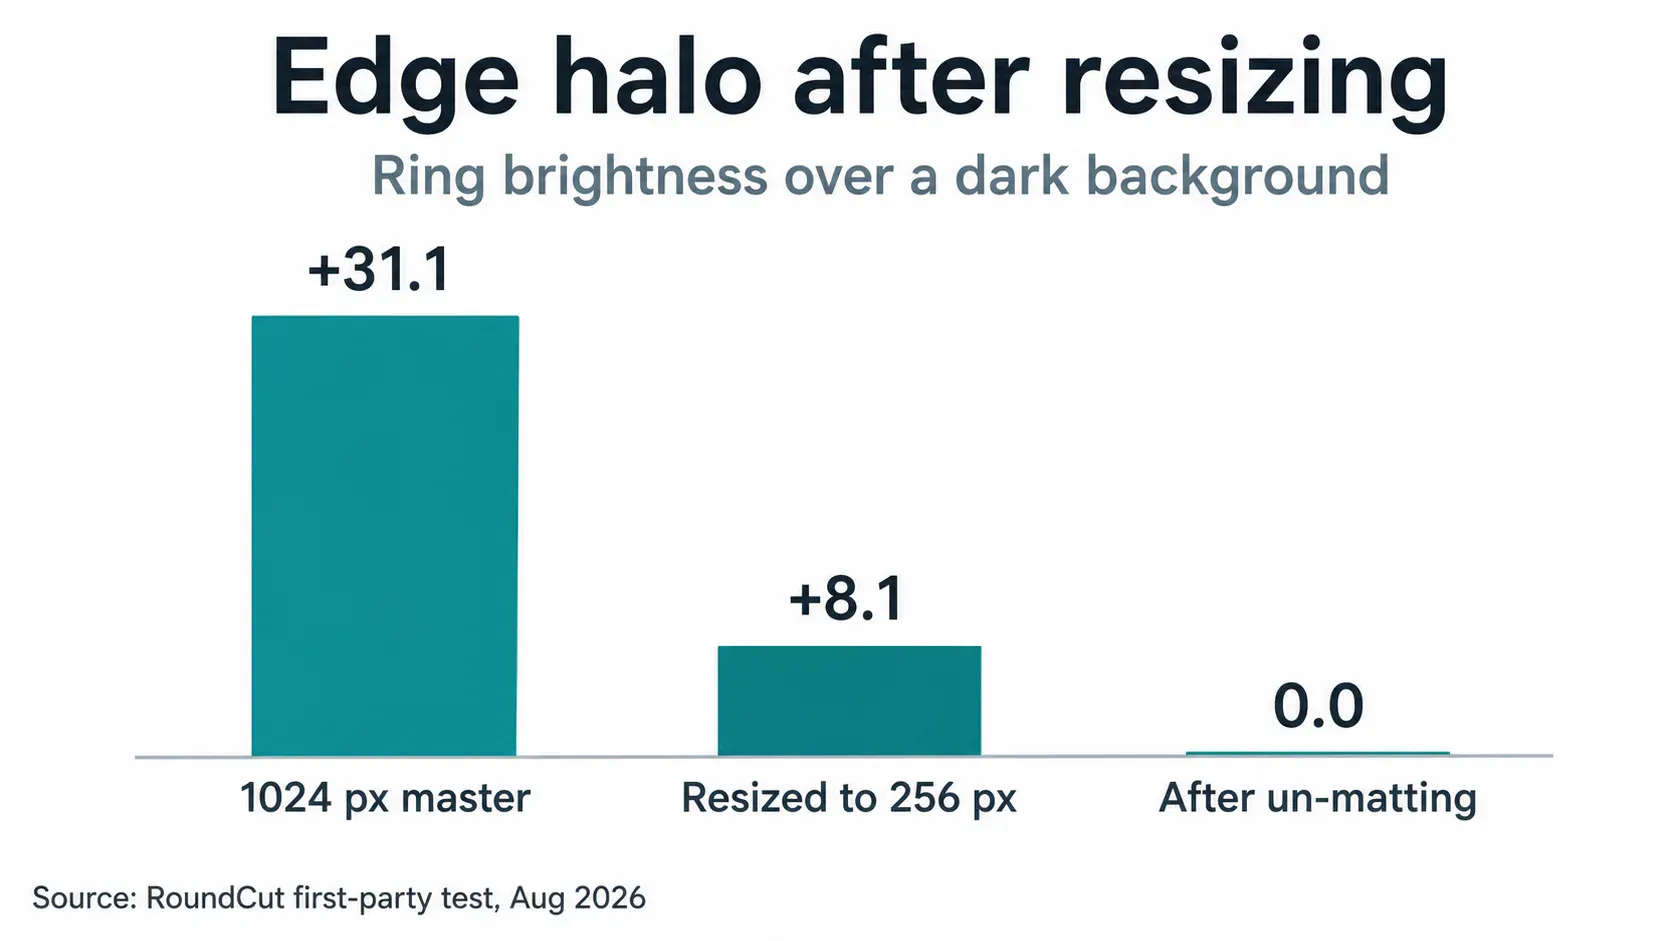
Reversing it is arithmetic, not magic. Subtract the known backdrop back out of each edge pixel, weighted by how transparent it is: subject = (observed − (1 − alpha) × white) ÷ alpha. Running that on my file dropped the mean shift to 0.0, with a worst pixel of 0.69 out of 255, which is below anything a screen will show you. Editors bury the same operation under a matting menu, and libvips exposes the underlying step as premultiply, documented as multiplying each color band by alpha divided by max alpha.
Why shrinking is what makes you notice
The ring is thin and it stays thin. Measured on the same circle, it averaged 1.06 px thick at 1024, 1.05 px at 256, and 1.01 px at 128. What changes is how much of the picture it owns: 3,400 edge pixels are 0.32% of a 1024 px image, but 408 edge pixels are 2.49% of a 128 px one. Shrink an avatar to Discord size and that defect gets almost eight times more of the frame while every other detail gets smaller.
Dark mode is the other half. The absolute error is identical on any background, roughly 8 luma points at 256 px, but it lands differently. Over #111111 the clean edge is only 23.3 points brighter than its surroundings, so 8 more points is a 35% jump in local contrast and your eye reads a line. Over white, the edge is already about 100 points darker than the field, and the same 8 points is under a tenth of that. Same file, same math, and the ring appears the day someone flips your profile card to a dark theme.
Fixing a cutout you already have
If you still have the original photo, redo the cutout instead of repairing it. That’s the honest first move, because the alpha estimate and the color correction come from the same pass, and a remover that un-mattes the edge gives you a file that survives any background. RoundCut’s background remover runs entirely in the browser, so the original never leaves your device, and the same rule applies here as with hair against a dark wall: contrast in the source photo decides the edge quality, not the export settings.
When the original is gone and all you have is the PNG, three moves are worth trying, in this order:
- Contract the mask by one pixel. Crude, and it eats a sliver of the subject, but on a logo with hard edges it’s often invisible and it takes seconds.
- Un-matt the edge with the formula above, if you know what the backdrop was. White is the usual answer for product shots and scans.
- Rebuild the silhouette from scratch on anything with fine detail. Thin chain links and scanned signatures never survive step 1.
Then export at the size you’ll actually publish, once. Going 1024 → 256 in the browser and shipping that beats letting a platform’s uploader do it for you, and it’s what our resize tool is for. Format matters less than people think here: my clean 256 px circle weighed 107 KB as PNG, 17.9 KB as WebP at quality 90, and 9.6 KB as AVIF at quality 60, all with the alpha intact. There’s more nuance in which format holds transparency best, and if the file is just too heavy, shrinking a transparent PNG is a separate job from fixing its edge.
One thing to skip: flattening onto white to hide the ring. It works right up until the file lands on a dark card, and it’s the same trap as the JPG black box. If the destination is a round profile picture, the circle mask will cut through your fake white background at an angle nobody predicted, and you’ll see both defects at once. A circle-cropped logo needs the real alpha.
The pipelines that genuinely do leak
None of this means the old advice was invented. Tauri’s icon generator was still shipping the bug in version 2.8.5. The bug report describes “a faint gray/uneven fringe around curved edges” and names the cause as a resize pipeline running Lanczos3 “on non-premultiplied RGBA data, causing RGB ‘leak’ from semi-transparent edge pixels during downscaling”. The sharp issue tracker carries a matching report, “a thin white line where the transition from the alpha channel happens”, labeled blocked on an upstream dependency.
The tell is which pixels changed. A true resampler leak shifts the edge toward whatever color hides under the transparency, so my white-file-versus-black-file test separates the two in one run: different results mean your pipeline leaks, identical results mean the cutout was already carrying the ring. Build both files once and keep them around. If you generate app icons or asset sets through a custom toolchain, run them through it every time you upgrade a dependency, because this is the class of bug that comes back quietly.
And if the ring survives a clean re-cut, the problem moved: the alpha values themselves are wrong, which usually traces back to a subject that never had enough contrast against its backdrop to begin with. No resizer fixes a bad mask, and neither does the arithmetic.


