Compress Image to 100 KB Guide 2026: Resize First
Compress an image to 100 KB without crushing detail: crop dead space, resize pixels, then lower quality only as much as needed.

Contents
To compress an image to 100 KB, don’t start by dragging quality to the floor. Check the current file size, crop empty edges, resize the long side if the image is oversized, then run one compression pass. Use JPEG for ordinary photos and keep PNG only when transparency or crisp interface text matters.
The 100 KB order of operations
A 100 KB target is small enough that pixel dimensions matter more than the quality slider. If the image is already close, a light JPEG pass may do it. If it is a camera original, resize first or you will trade clean edges for mush.
Start with the native editor you already have. On iPhone, Photos lets you crop and choose preset ratios before you export, including Square and 9:16 in Apple’s own crop guide. On macOS, Preview’s Adjust Size dialog can resample the image and show the new size before you save. On Windows, PowerToys Image Resizer is the better native-ish route for batches because it accepts pixel dimensions and JPEG quality values from the shell.
That first pass is boring, but it protects the image. Cropping a screenshot from 2532 px wide down to the actual dialog box often saves more than another 20 points of JPEG quality, and a product photo with dead tabletop around the item has the same problem (which is where most quality sliders get abused). Fix the canvas before you punish the pixels.
Native ways to shrink the image first
Use the built-in route when the file only needs a crop or a modest resize. It is faster, private, and good enough for a single LinkedIn headshot, an upload form, or a product proof you are sending by email. The drawback is control: phone editors usually do not tell you whether the export landed at 143 KB or 98 KB until after you save and check the file.
On iPhone Photos, crop away the empty frame, then use the share/export path that creates a smaller copy if available on your device. In macOS Preview, open Tools, Adjust Size, turn on resampling, and enter a smaller width. For Windows batches, PowerToys Image Resizer is cleaner than opening Paint five times.
When you need an exact cap, move to a browser compressor after the crop. RoundCut Compress is the quick pass: drop the file, check the preview, and export without creating an account. Its limitation is the same as every compressor’s limitation. If the source is far too large, compression alone cannot preserve detail at 100 KB.
A practical 100 KB decision table
The useful question is not “what quality setting should I use?” The useful question is “what kind of file am I holding?” A 940 x 627 product JPEG may already be under the cap, while a wide photo at the same visual quality can miss by a few kilobytes.
| Starting file | First move | Why it works |
|---|---|---|
| Already under 100 KB | Leave it alone | Re-exporting can add artifacts without solving anything |
| 100-140 KB photo | Try JPEG quality around the high 70s | Small files often need a light pass, not a resize |
| Oversized phone photo | Resize the long side first | Fewer pixels means less data to compress |
| Screenshot with text | Crop first, then test PNG or JPEG | Text edges fall apart when JPEG quality drops too far |
| Transparent PNG | Keep PNG/WebP if transparency matters | Flattening to JPEG removes alpha |
I ran a small local check for this post with ImageMagick on three sample files. The landscape file started at 132 KB. A quality-82 JPEG pass landed at 112 KB, still too large; a quality-76 pass landed at 98 KB; a 900 px version at quality 72 landed at 67 KB. The profile and product samples were already below the cap, so the right move was no move at all.
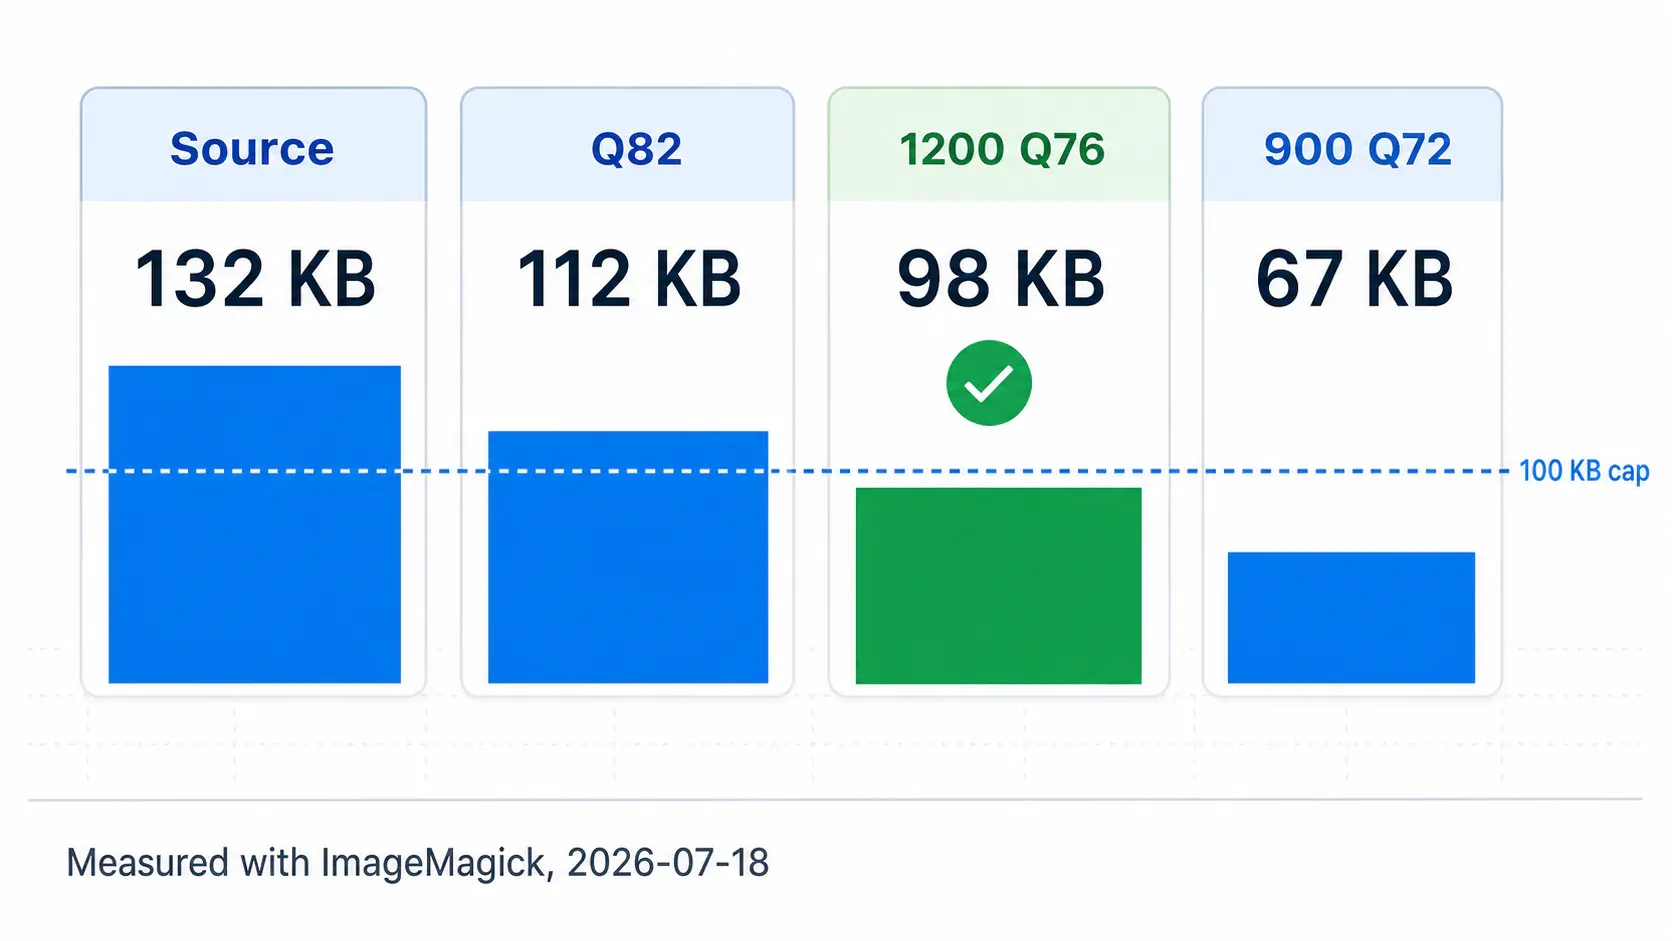
That is the part most 100 KB tools hide. The target is a ceiling, not a badge. If your image is 63 KB and looks fine, don’t chase a rounder number.
RoundCut when you need a browser pass
RoundCut makes sense when you need a visible result, a download, and no install. Use the native crop first, then RoundCut Resize if the dimensions are obviously too large, then compress. That order keeps visual hierarchy intact in a headshot: eyes stay sharp, hair doesn’t turn into a soft outline, and small logo counter-forms survive.
For a typical upload form, I start with a long side between 900 and 1600 px, then compress. The lower end is fine for avatars, support tickets, and thumbnails. The upper end is safer when the image will be viewed full-width in a document or profile page. If you already know the destination has a larger limit, use this 2 MB workflow instead; 100 KB is a harsh target for anything people need to inspect.
There are two cases where I would skip the 100 KB target unless the form forces it. First, screenshots with tiny UI labels. Use the screenshot guide because PNG, WebP, and crop area matter more there. Second, transparent logos. If the alpha channel is the point, read that PNG workflow before flattening anything to JPEG.
Format choices that keep the file readable
JPEG is still the sensible default for ordinary photos because it is a lossy photo format, while PNG is the safer pick when transparency or precise reproduction matters, as MDN’s image format guide lays out. That distinction matters at 100 KB. A photo can hide some compression in skin texture or background blur. A screenshot exposes every block.
If the destination accepts modern formats, you can also use RoundCut Convert after resizing. WebP can be a good middle ground for web use, but don’t assume every form accepts it. Government forms, old CMS uploaders, and some marketplace dashboards still ask for JPG or PNG. Boring compatibility wins when the upload deadline is now.
Email is a different case. Gmail documents a 25 MB attachment limit, and Microsoft’s Outlook support page lists a 20 MB limit for internet email accounts. You usually do not need 100 KB for email unless you are sending many images or working around a strict form. For that use case, follow the email version and keep more detail.
Quick fixes for stubborn files
If the file refuses to land under 100 KB, do not keep dragging quality down in five-point steps. Make one structural change (which keeps the comparison honest).
- Crop the blank area around the subject.
- Resize the long side to 1600 px, then test.
- If it’s still too large, try 1200 px.
- For avatars and tiny previews, test 900 px.
- Export once more and compare edges at 100% zoom.
On Android, the same logic applies before compression: crop, reduce dimensions if your gallery app allows it, then export. I cover that path here in more detail. For iPhone photos, the iPhone file-size route is usually enough until you need an exact numeric cap.
My practical rule: if the subject is still recognizable at 900 px, use resizing to reach 100 KB. If the subject needs inspection, keep the larger image and question the cap. A clean 140 KB file is often more useful than a 99 KB file with broken texture, unless the upload form refuses to move.


